mysql workerbranch를 설치한다https://dev.mysql.com/downloads/workbench/ mysql workerbranch를 설치한다https://dev.mysql.com/downloads/workbench/
MySQL:: Download MySQL Workbench Download MySQL Community MySQL Workbench General Availability (GA) Release Archive Select MySQL Workbench 8.0.34 Operating System: We recommend that you download: Additional Downloads: Windows (x86, 64-bit), MSI Installer 8.0.34 46.4M Download (mysql-workbench-community-8.0.34-winx64.msi) M…dev.mysql.com MySQL::: Download MySQL Community MySQL Community Select MySQL Workbench General Availability (GA) Release Archive MySQL Workbench 834: We recommend that you download: Additional Downloads: Windows (x86, 64-bit), MSI Installer 8.0.34 46.4M Download (mysql-workbench-community-8.0.34-winx64.msi)M…dev.mysql.com
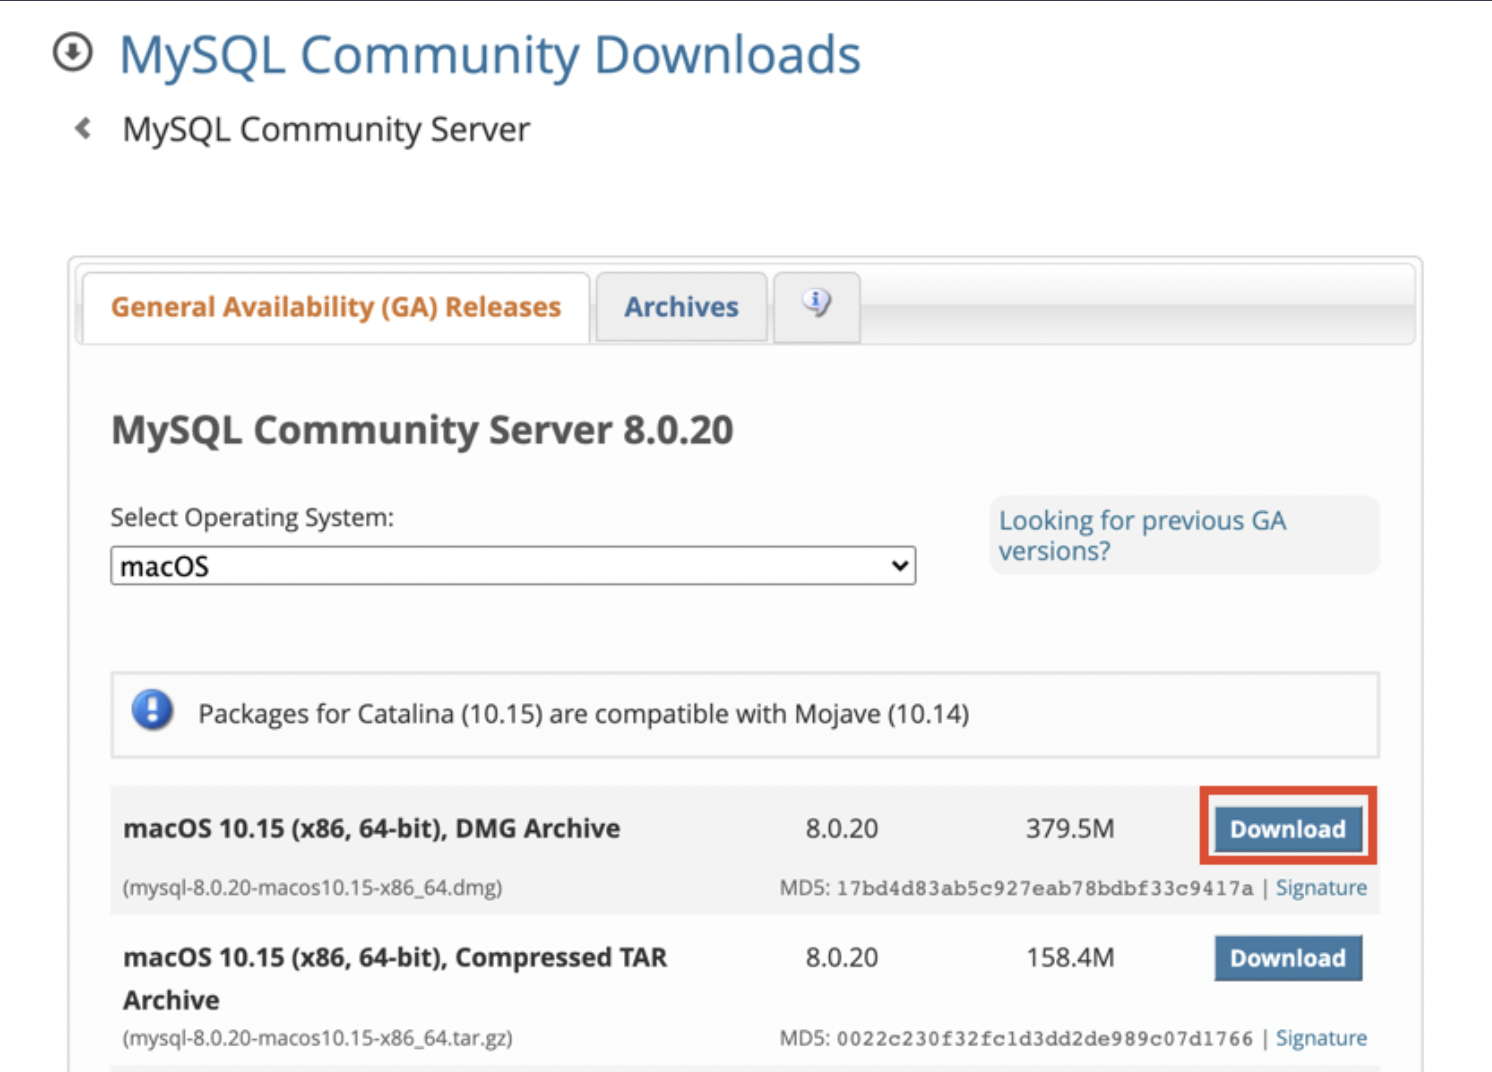
For your information, click Archives for Mac spheres and select the version to receive the package For your information, click Archives for Mac spheres and select the version to receive the package
인기글

")


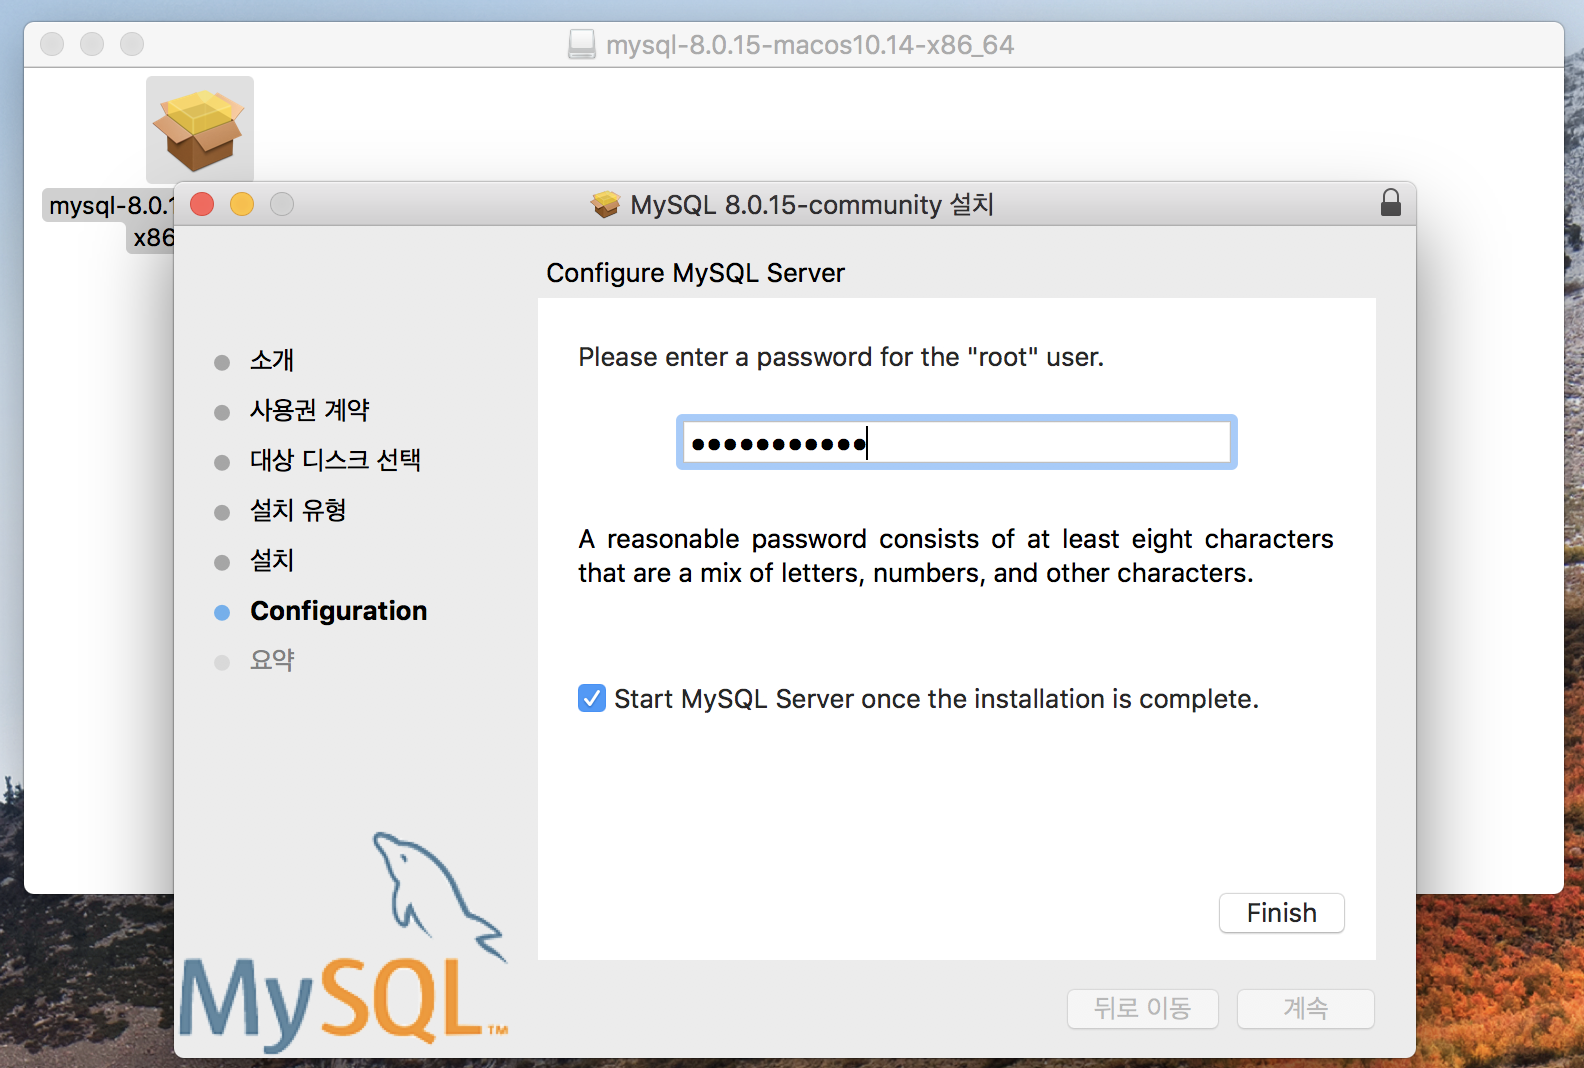
Set the password to use for the root account after running the package (remember the password well) Set the password to use for the root account after running the package (remember the password well)
1. log in to mysql terminal 1. log in to mysql terminal
Enter mysql-uroot-p// password to connect to mysql server Enter mysql-uroot-p// password to connect to mysql server
2. Register a new account 2. register a new account
CREATE USER ‘newuser’@’localhost’ を ‘password’ で識別; // 새 사용자 와 암호 부분을 입력해주면 된다예) CREATE USER root@localhost を 1234 で識別; CREATE USER ‘newuser’@’localhost’ を ‘password’ で識別; // 새 사용자 와 암호 부분을 입력해주면 된다예) CREATE USER root@localhost を 1234 で識別;
3. 계정이 잘 생성되었는지 확인합니다 3. 계정이 잘 생성되었는지 확인합니다
// mysql 서버에 연결된 상태에서 USE mysql; // mysql 데이터베이스를 사용하도록 설정 SELECT user, host FROM user; // user 테이블에서 사용자 계정 조회 // mysql 서버에 연결된 상태에서 USE mysql; // mysql 데이터베이스를 사용하도록 설정 SELECT user, host FROM user; // user 테이블에서 사용자 계정 조회
-계정이 등록되어 있는 것을 확인할 수 있다 나는 Workerbranch에서 작성한 계정을 그대로 접속하려고 하고 있다 – 계정이 등록되어 있는 것을 확인할 수 있다 나는 Workerbranch에서 작성한 계정을 그대로 접속하려고 하고 있다
Deaver 실행 1. 새로운 데이터베이스 연결을 눌러 mysql을 선택한다. Deaver 실행 1. 새로운 데이터베이스 연결을 눌러 mysql을 선택한다
2. batabase란은 원하는 대로 작성해도 됨(빈칸도 가능) 3. 방금 mysqlworker branch에서 설정해준 패스워드를 입력해 줌 4. 왼쪽 하단에 Test Connection 버튼을 클릭하여 연결된 것을 확인한 후 finish 버튼을 클릭 2. batabase란은 원하는 대로 작성해도 됨(빈칸도 가능) 3. 방금 mysqlworker branch에서 설정해준 패스워드를 입력해 줌 4. 왼쪽 하단에 Test Connection 버튼을 클릭하여 연결된 것을 확인한 후 finish 버튼을 클릭
그러면 이렇게 데이터베이스가 생성된다 그러면 이렇게 데이터베이스가 생성된다
[장고랑 DBeaver 연결] 데이터베이스를 설정하는 파일로 설정한다. 예) mysettigns [장고랑DBeaver연결] 데이터베이스를 설정하는 파일로 설정한다. 例)mysettigns
DATABASES = {‘default’: {‘ENGINE’: ‘django.db.backends.mysql’,’NAME’: ‘スキーム名’USER’: ‘ユーザー名’, PASSWORD’: ‘パスワード’HOST’: ‘localhost’, ‘PORT’: ‘3306’, ‘OPTIONS’: {‘init_command’: “SET sql_mode=’STRICT_TRANS_TABLES’, ”charset’: ‘utf8mb4′, use_unicode’: True,}}} DATABASES = {‘default’: {‘ENGINE’: ‘django.db.backends.mysql’,’NAME’: ‘スキーム名’USER’: ‘ユーザー名’, PASSWORD’: ‘パスワード’HOST’: ‘localhost’, ‘PORT’: ‘3306’, ‘OPTIONS’: {‘init_command’: “SET sql_mode=’STRICT_TRANS_TABLES’, ”charset’: ‘utf8mb4′, use_unicode’: True,}}}
name : 원하는 이름으로 설정해 줍니다. 이 이름으로 Deaver와 연결됩니다 user: 터미널에서 확인한 계정 ID password: 터미널에서 확인한 계정 비밀번호 port: mysql은 3306 name: 원하는 이름으로 설정해 줍니다. 이 이름으로 Deaver와 연결됩니다 user:터미널에서 확인한 계정ID password:터미널에서 확인한 계정비밀번호 port:mysql는 3306
Databases 오른쪽 클릭 -> 새로운 데이터베이스 생성 Databases 오 른쪽 클릭 -> 새로운 데이터베이스 생성
mysettigns에서 작성해준 name을 입력해주는 마이그레이션, 마이그레이션을 해줍니다 mysettigns에서 작성해준 name을 입력해주는 마이그레이션, 마이그레이션을 해줍니다
python 관리. Pymake 이행의 Sython 관리. 파이마이그레이트 python 관리. Pymake 이행의 Sython 관리. 파이마이그레이트
Deaver로 접속된 것을 확인합니다. 제가 등록한 name의 database > Tables를 클릭합니다 Deaver로 접속된 것을 확인합니다. 제가 등록한 name의 database > Tables를 클릭합니다